Honda CR-V: Maintenance Under the Hood / Changing the Engine Oil and Oil Filter
You must change the engine oil and oil filter regularly in order to maintain the engine's lubrication. The engine may be damaged if they are not changed regularly. Specialized equipment and procedures are required to change the engine oil and oil filter. Have an authorized Honda dealer replace them.
Do not attempt to change the engine oil and oil filter yourself.
Change the oil and filter in accordance with the maintenance message on the driver information interface.
- Run the engine until it reaches normal operating temperature, and then turn the engine off.
- Open the hood and remove the engine oil fill cap.
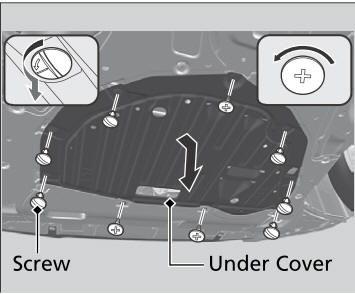
- Remove the phillips head screws and slotted head screws by turning 90° counterclockwise on the undercarriage and remove the under cover.
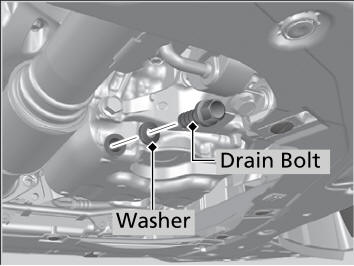
- Remove the drain bolt and washer from
the bottom of the engine, and drain the
oil into a suitable container.
- Remove the oil filter and dispose of the
remaining oil.
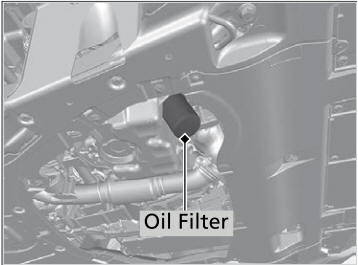
- Check that the filter gasket is not stuck to
the engine contact surface.
- If it is stuck, you must detach it.
- Wipe away dirt and dust adhering to the
contact surface of the engine block, and
install a new oil filter.
- Apply a light coat of new engine oil to the oil filter gasket.
- Put a new washer on the drain bolt, then
reinstall the drain bolt.
- Tightening torque: 30 lbf∙ft (40 N∙m, 4.0 kgf∙m)
- Pour the recommended engine oil into the
engine.
- Engine oil change capacity (including filter): 3.7 US qt (3.5 L)
- Reinstall the engine oil fill cap securely and start the engine.
- Run the engine for a few minutes, and then check that there is no leak from the drain bolt or oil filter.
- Stop the engine, wait for three minutes, and
then check the oil level on the dipstick.
- If necessary, add more engine oil.
- Reinstall the under cover in the same order it was removed.
NOTICE
You may damage the environment if you do not dispose of the oil in a suitable way. If you are changing the oil by yourself, appropriately dispose of the used oil. Put the oil in a sealed container and take it to a recycling center. Do not throw the oil away into a garbage can or onto the ground.
You will need a special wrench to replace the oil filter. You can buy this wrench from a dealer.
When installing the new oil filter, follow the instructions supplied with the oil filter.
Reinstall the engine oil fill cap. Start the engine. The low oil pressure indicator should go off within five seconds. If it does not, turn off the engine, and check your work.
Be sure to verify that the oil filter is designed for your vehicle. A Honda genuine oil filter is recommended for optimum lubrication flow and filtration properties to assure the reliability of the engine.
 Adding Engine Oil
Unscrew and remove the engine oil fill cap.
Add oil slowly.
Reinstall the engine oil fill cap, and tighten
it securely.
Wait for three minutes and recheck the
engine oil dipstick...
 Engine Coolant
Specified coolant: Honda Long Life Antifreeze/Coolant Type 2
This coolant is premixed with 50% antifreeze and 50% water. Do not add any
straight antifreeze or water...
Other information:
Honda CR-V 2017-2025 Owner's Manual: Changing the Screen Interface
You can change the screen interface design. Select . Select Settings. Select System. Select the Others tab. Select Change Skin. Select Next, then a confirmation message appears on the screen. Select Yes. After changing the screen interface design, you can change the wallpaper by following procedure...
Honda CR-V 2017-2025 Owner's Manual: Rear Seat Heaters *
*: Canadian models only, if equipped There is no heater in the rear center seating position. Press the seat heater button: Once - The HI setting (three indicators on) Twice - The MID setting (two indicators on) Three times - The LO setting (one indicator on) Four times - The OFF setting (no indicators on) The rear seat heaters is turned off every time you start the engine, even if you turned it on the last time you drove the vehicle...
Categories
- Manuals Home
- Honda CR-V Owners Manual
- Honda CR-V Service Manual
- Jump Starting Procedure
- Odometer and Trip Meter
- Driver Attention Monitor
- New on site
- Most important about car
Advanced Airbags
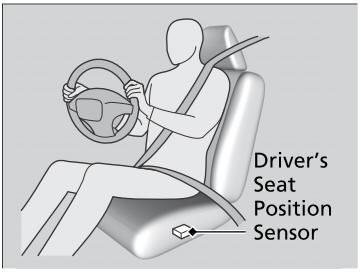
The airbags have advanced features to help reduce the likelihood of airbag related injuries to smaller occupants.
The driver's advanced airbag system includes a seat position sensor.